The tuning of a pre-trained model is a crucial application for transfer learning in machine learning. It is a process of learning to re-adjust initially pre-trained models, with some big datasets, to become specific to the problem, but with relatively small datasets. Among the tools to do this, one of the most powerful is TensorFlow, a well-known framework in deep learning. This article delves through the steps to fine-tune a pre-trained model with the TensorFlow package, including reasons for fine-tuning, preparation steps, and detailed realization of further steps.
Fine-tuning, in essence, involves training a model that has already been pre-trained on a dataset and updating its weights. The process is always more worthwhile for several reasons:
a. Shorter Training Time: Other than training the model from scratch-which is a very expensive and time-consuming procedure, fine-tuning takes a previously trained model that already has useful features.
b. Performance Gains: Pretrained models work or models trained with huge datasets such as ImageNet, have learned rich feature representations that can be successfully transferred to your task.
c. Smaller Data Requirements: Compared to training a model from scratch, less data is required for fine-tuning, therefore, making fine-tuning appropriate for small-dataset tasks.
Before working with the code, you should install TensorFlow. You can install it by using pip. You may require other libraries depending on your task at hand such as numpy for numerical operations, matplotlib for plotting, and so on.
TensorFlow contains different pre-trained models that can be downloaded under the module tf.keras.applications. They are trained on very huge datasets and can be used for fine-tuning. Some of the common models are:
a. VGG16: Very simple and effective.
b. ResNet50: It's an architecture that has residual connections, enabling it to work better for deep networks.
c. InceptionV3: It is one of the efficient and high-performance models.
To fine-tune, your data must be in a TensorFlow-compatible format. To ensure that your data meets the pre-trained model's input requirements, you must preprocess it. To expedite this procedure for picture data, utilize the tf.keras.preprocessing.image. ImageDataGenerator streamlines this process.
from tensorflow.keras.preprocessing.image import ImageDataGenerator
# Define the data generator for training data
train_datagen = ImageDataGenerator(
rescale=1./255,
shear_range=0.2,
zoom_range=0.2,
horizontal_flip=True
)
train_generator = train_datagen.flow_from_directory(
'path_to_train_data',
target_size=(224, 224),
batch_size=32,
class_mode='binary'
)
Change 'path_to_train_data' to the actual path to your training set. Many pre-trained models demand that pixel values be normalized to the range [0, 1], which is what the rescale parameter does.
Building a new model on top of the pre-trained base comes next after the base model has been loaded and the data is ready. Usually, this entails adding a few layers particular to your task:
from tensorflow.keras.models import Model
from tensorflow.keras.layers import Dense, GlobalAveragePooling2D
# Add custom layers on top of the base model
x = base_model.output
x = GlobalAveragePooling2D()(x)
x = Dense(1024, activation='relu')(x)
predictions = Dense(1, activation='sigmoid')(x)
# Define the new model
model = Model(inputs=base_model.input, outputs=predictions)
To provide predictions, Dense layers are added after GlobalAveragePooling2D lowers the spatial dimensions of the feature maps. By your job, modify the Dense layers and output activation (e.g., softmax for multi-class classification).
Freeze the base model's layers to prevent changing the pre-trained weights. This guarantees that the only weights updated during training are those of the recently added layers.
for layer in base_model.layers:
layer.trainable = False
Assemble the model by defining the optimizer, evaluation metrics, and loss function. Binary cross-entropy can be used as the loss function for binary classification:
model.compile(optimizer='adam', loss='binary_crossentropy', metrics=['accuracy'])
Use categorical_crossentropy for multi-class classification, then modify the output layer and labels as necessary.
Utilizing your data, train the model. Start with fewer epochs because fine-tuning usually takes less time than training from scratch:
history = model.fit(
train_generator,
steps_per_epoch=train_generator.samples // 32,
epochs=10
)
Observe the training process and adjust accordingly either the number of epoches or the learning rate.
You can then unfreeze some layers of the base model, after training the top layers, and continue training - a method that allows the model to fine-tune the pre-trained weights to adapt to your data:
# Unfreeze some layers of the base model
for layer in base_model.layers[:100]:
layer.trainable = True
# Re-compile the model
model.compile(optimizer=tf.keras.optimizers.Adam(lr=0.0001), loss='binary_crossentropy', metrics=['accuracy'])
# Continue training
history_fine = model.fit(
train_generator, steps_per_epoch=train_generator.samples // 32,
epochs=5
)
In this example, the first 100 layers have been unfrozen. You can adjust this number up or down as you see fit.
After you have fine-tuned, assess the model's performance on a validation set, so you are certain it generalizes well:
Python
# Evaluate the model val_loss, val_accuracy = model.evaluate(validation_generator)
print(f'Validation Loss: {val_loss}, Validation Accuracy: {val_accuracy}')
Finally, save your fine-tuned model for later use:
python
model.save('fine_tuned_model.h5')
Fine-tuning a pre-trained model in TensorFlow generally includes the following steps-selection of an appropriate pre-trained model, data preparation, building a new model atop, freezing and unfreezing of layers, and training and model evaluation. With the use of a pre-trained model, transfer learning allows high performance with less computational resources and training time.
This is quite a useful approach for a variety of tasks, from image classification to natural language processing, which might be transformed further to suit any new machine learning method.
1. What is fine-tuning in TensorFlow?
A: Fine-tuning in TensorFlow refers to the process of taking a pre-trained model and further training it on a new dataset to adapt it to a specific task. This involves adjusting the model’s weights to improve its performance on the new task.
2. Why should someone use a pre-trained model for fine-tuning?
A: Using a pre-trained model can save time and computational resources since the model has already learned useful features from a large dataset. Fine-tuning allows you to leverage this knowledge and apply it to your specific task with a smaller dataset.
3. Which pre-trained models are available in TensorFlow for fine-tuning?
A: TensorFlow offers several pre-trained models through its tf.keras.applications module, including ResNet50, VGG16, InceptionV3, and more. These models are trained on large datasets like ImageNet and are commonly used for tasks such as image classification.
4. How does someone prepare my data for fine-tuning a model in TensorFlow?
A: To prepare your data, you need to preprocess it to match the input requirements of the pre-trained model. This typically involves resizing images, normalizing pixel values, and applying data augmentation techniques.
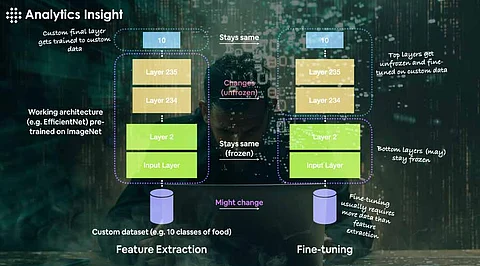
5. What does it mean to freeze layers in a pre-trained model?
A: Freezing layers in a pre-trained model means locking the weights of those layers so they are not updated during training. This helps retain the learned features from the original training and allows the new layers added on top to learn specific features for your task.